Best Grenades in CS2 Without Jumpthrow Bind. Mirage, Inferno, Nuke
At the end of summer 2024, Counter-Strike 2 saw a shocking update that, at first glance, significantly affected gameplay. The most commonly used bind, “jumpthrow,” was banned by the developers, making it impossible to throw grenades with a single button while jumping. This not only complicates the execution of lineups but also affects the precision of grenade throws. Although all smokes still work, not everyone manages to land their grenades accurately, which greatly impacts the comfort of gameplay. Less experienced players have been looking for ways to remain useful on the server and feel confident when throwing grenades. To help in these situations, we’ve selected grenades that don’t require the “jumpthrow” bind, which will still be highly effective. Study these lineups and try to secure these spots on the map before your teammates, so that the blame for a missed grenade doesn’t fall on you.
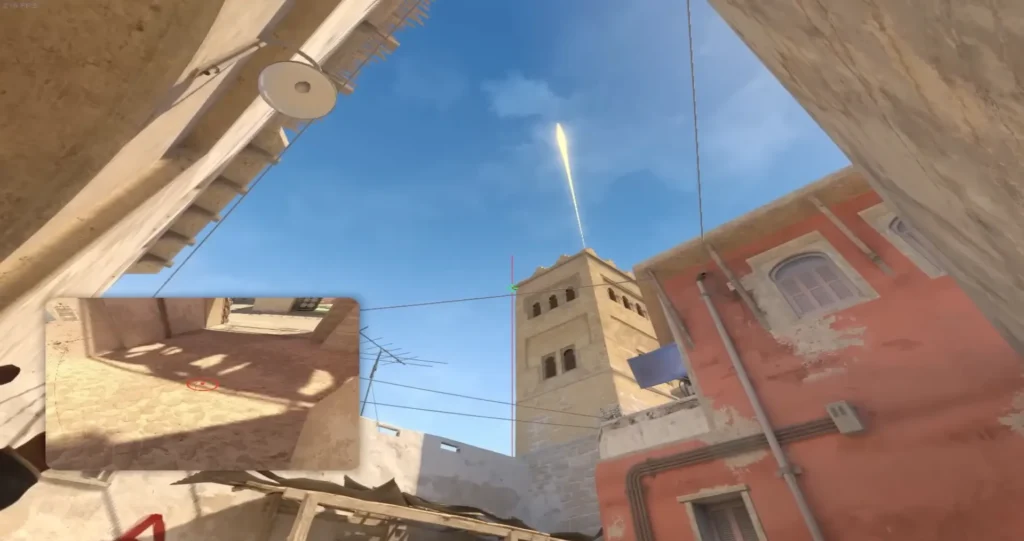
Mirage A Site. Smoke for Stairs from Pit.
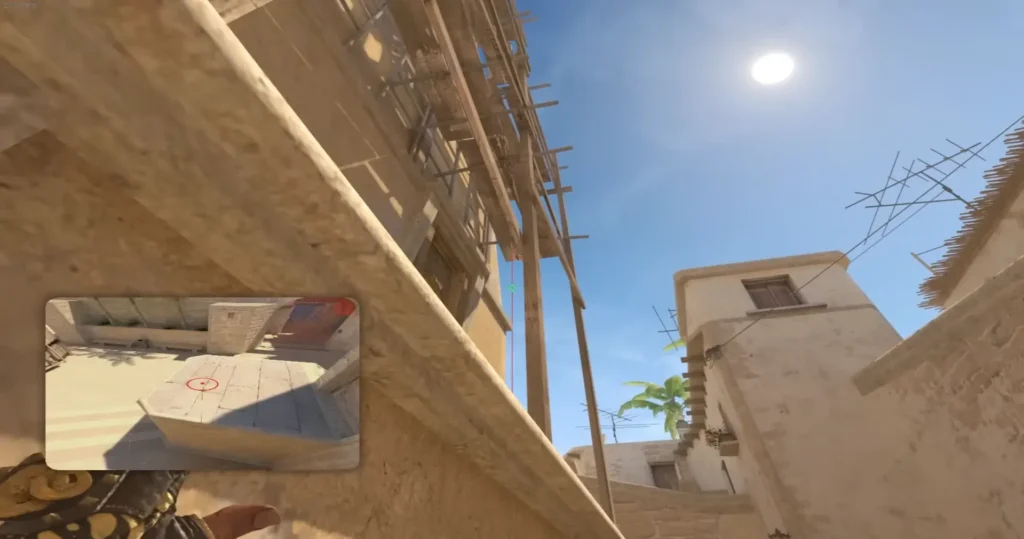
When executing an A-site push, terrorists often use a smoke grenade to block the enemy’s vision from the stairs. This spot is regularly occupied by a player who either started there, watching for the push from pit/palace, or rotated from the connector. To avoid worrying about this spot, it must be covered with a smoke, and if an opponent tries to peek through it, you’ll have a clear advantage. To throw this smoke, stand on the ledge in the middle of the wall and aim as shown in the image.
Mirage A Site. “Between” Smoke.
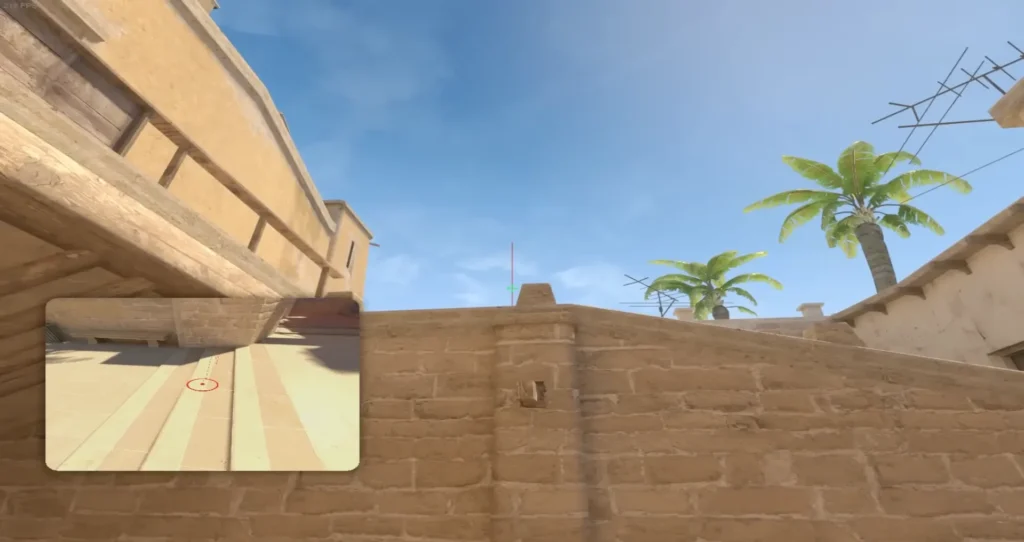
Another crucial grenade for an A-site push, this smoke blocks vision for enemies in connector, jungle, and even short. Having this smoke is essential as it cuts off the rotation for nearly half the map. Players from B site won’t be able to assist their teammates, and the player in the window will also be left without proper vision. It’s best to throw this smoke in combination with the previous one – move a bit higher, walk to the pit exit, and stand opposite the ledge as shown in the screenshot. It’s almost impossible to miss this smoke, as the new smoke-filling mechanics leave no gaps between the walls.
Mirage A Site. Flash from the “Lamp.”
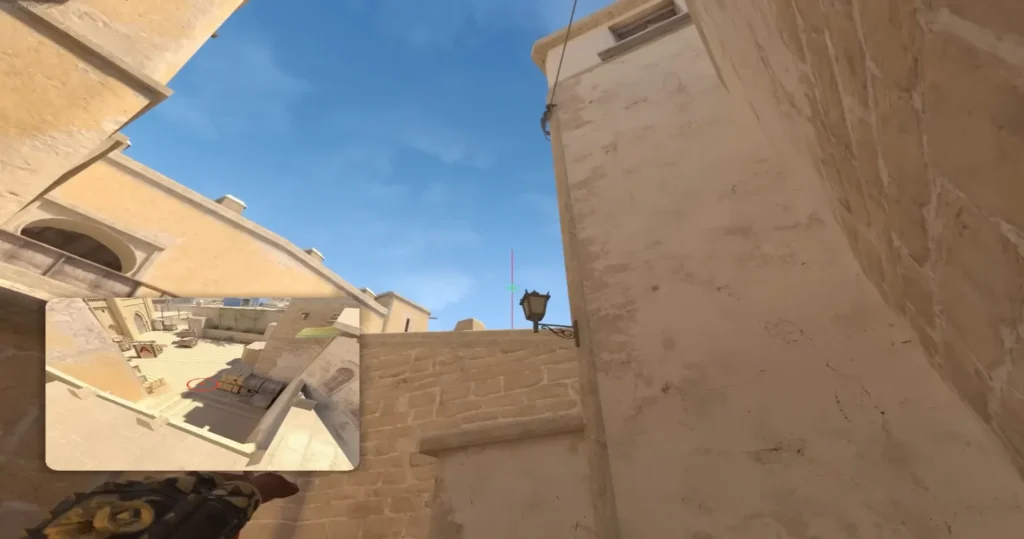
This iconic flashbang is used in almost every round to force counter-terrorists out of their positions. It’s useful for both quick and prepared site pushes with utility. Press against the right wall as you enter A site, stand in the middle of the metal door, and find the lantern on the wall. This flash will blind almost everyone on the site and detonates instantly, leaving the opponents no time to react or turn away.
Mirage B Site. Deep Smoke for Short.
A highly useful smoke grenade that will block the player on short or ladder and prevent enemies from assisting on B via mid for 20 seconds. Press into the right corner when exiting TV room and aim at the left corner of the building. The grenade flies quickly, so it will bloom before you even enter the site. In fact, this is a major advantage of grenades without “jumpthrow” – they land much earlier in the desired spot.
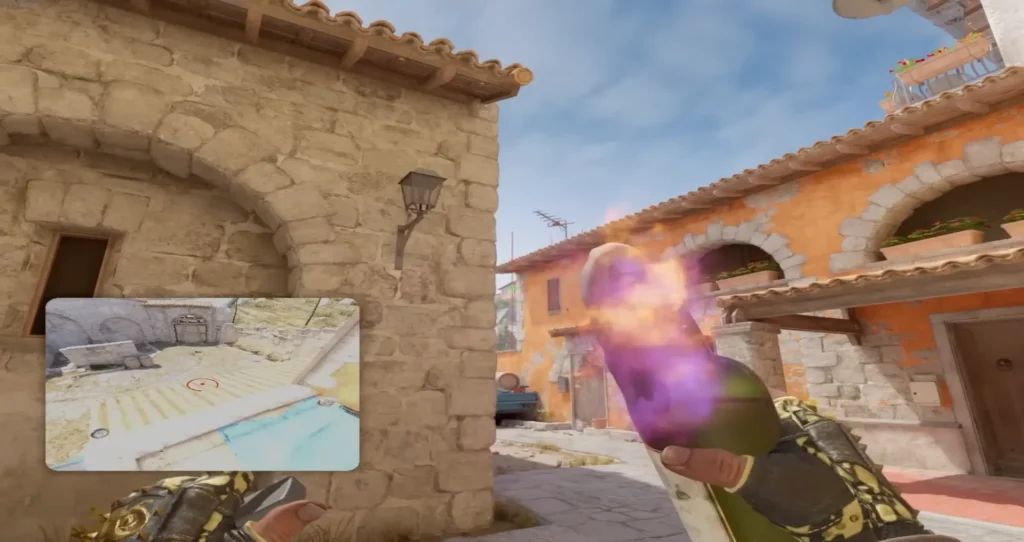
Nuke Outside. Smoke for Red Cross.
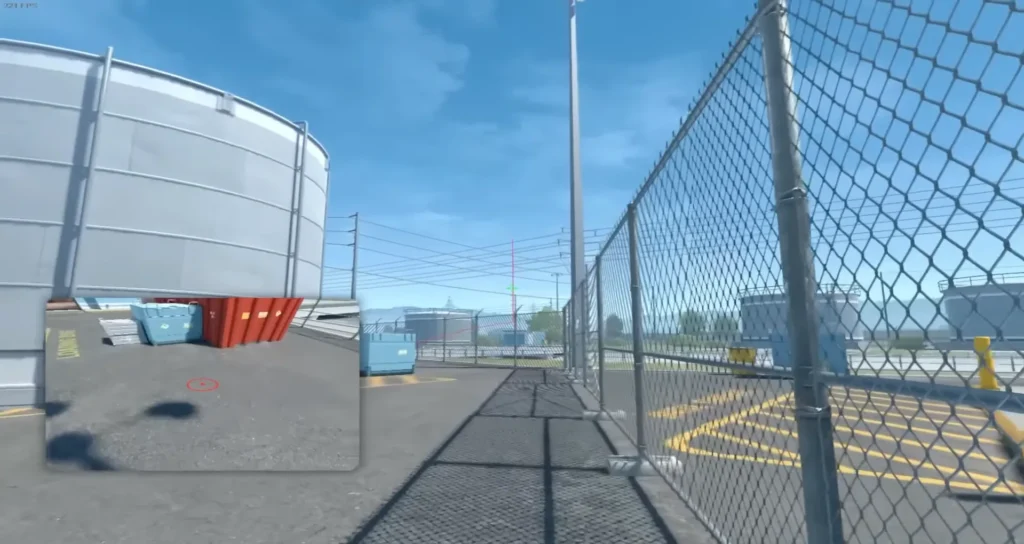
The most important grenade on this map and one of the few that doesn’t require jumping. When executing outside, press against the fence and use its shadow as a reference. After a few steps, release the smoke with the left mouse button. The grenade will land perfectly between the closest box and the red container, allowing you to safely take the position and confuse the enemy. Additionally, the grenade creates a great one-way on the first box, giving you an opportunity to peek at the player in garage or near main. Be sure to use it to deny your opponent information on the outside area and keep them nervous about this part of the map.
Nuke A Site. Flashes for the Plant.
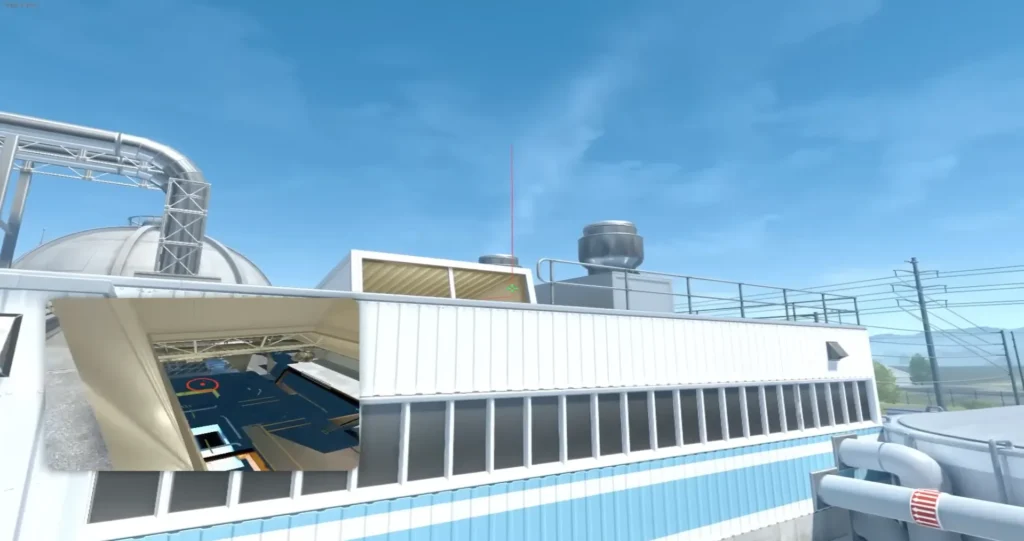
Most grenades on A are thrown through similar openings, but you need to break the glass first, preferably at the start of the round, so the enemy doesn’t get unnecessary information about your planned utility. Stand on the right round ledge, shaped like a closed pipe, and throw at least two flashes with a ricochet off the wall. They will explode in the middle of the site and won’t blind your teammates, as their vision of the explosion will be blocked by the vent textures. These flashes can also be used for pushing vents and heading towards B.
Nuke B Site. Molotov for the Aquarium Hiding Spot.
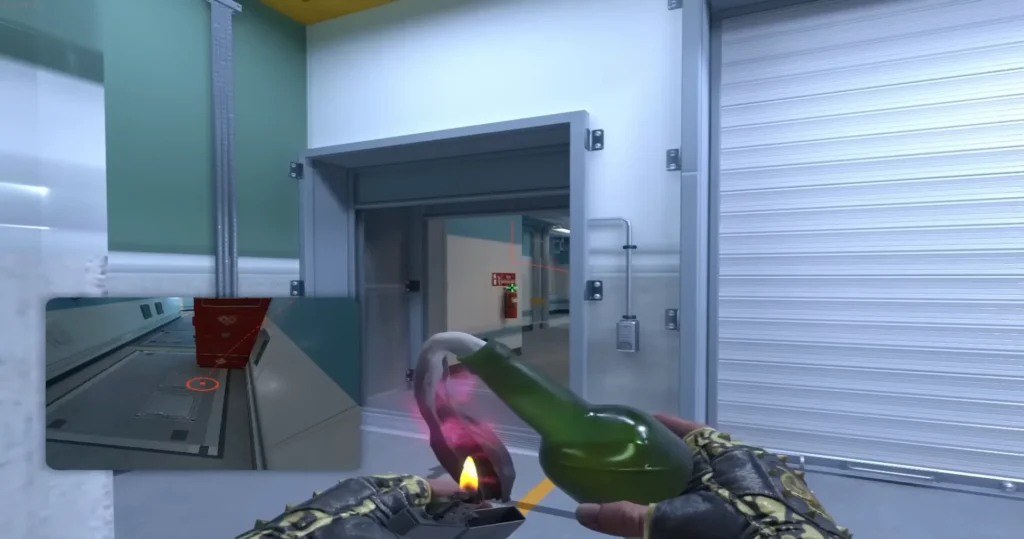
This isn’t the most popular spot on B, but it’s one that is almost never checked when entering the site. To ensure safety from it, throw this molotov and stop worrying about the position. Press against the left side of the wall near the fork, find the fire extinguisher, and throw the molotov. It will cover the entire area, and even if the player tries to escape, they will be left with only a few health points. Finishing them off after getting the information should be easy.
Inferno B Site. Smoke for CT and the Boost Spot.

Without this smoke, pushing B is almost pointless because, even after securing the bombsite, planting would be difficult with the open angle. This smoke is especially good because it blocks a potential counter-terrorist boost, which is often used both for holding and retaking. After taking control of Banana, find the two metal vents on the wall, stand in the middle of the first (right) one, and follow the lineup shown in the image. Don’t worry if you miss slightly – the passage will still be blocked, though the boost might remain open. Just practice a bit on the server.
Inferno B Site. Molotov for “Triple.”

When this grenade was discovered in CS, every player started throwing it, but the open skyboxes in CS2 made it impossible to use the same way. The trick is simple – now you need to throw it slightly to the left and without “jumpthrow,” which works perfectly for us. This position is very dangerous for terrorists because it allows the defenders to hold off enemies and hide without revealing their presence. Defenders often retreat here, killing several unsuspecting enemies. It’s best to eliminate all risks by cutting off the position with a molotov.
Inferno A Site. Smoke for Small Pit.
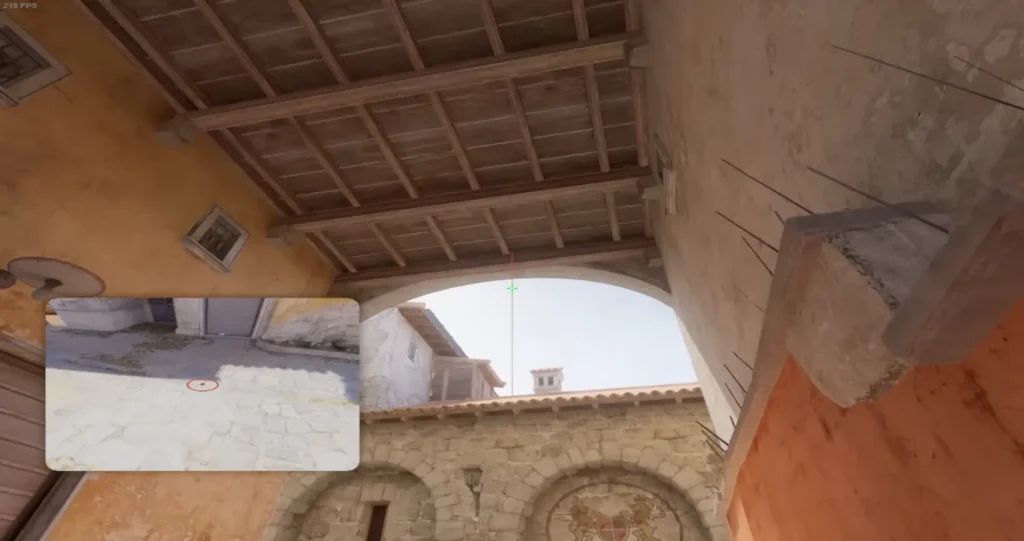
This grenade is very useful, though not the most convenient, as with the jumpthrow bind it could be thrown from safer positions. However, if you’ve already taken control near “Ribs,” why not take advantage of it and help yourself with the A site push? Cutting off the rotation from B site players is crucial for winning the round. Stand by the right wall of the arch, and you can throw the smoke without a specific reference point – it will still do the job.
Inferno A Site. Flash from Apartments.
Your smoke is already in Small Pit, and now the only dangerous spots are Big Pit and the site itself. To blind the enemies and prevent them from stopping your push, throw this legendary flashbang, or better yet, two. The key is to find the right texture “behind the map” and use it for the intended purpose. It’s impossible to turn away from this flash, which is why it’s so popular.
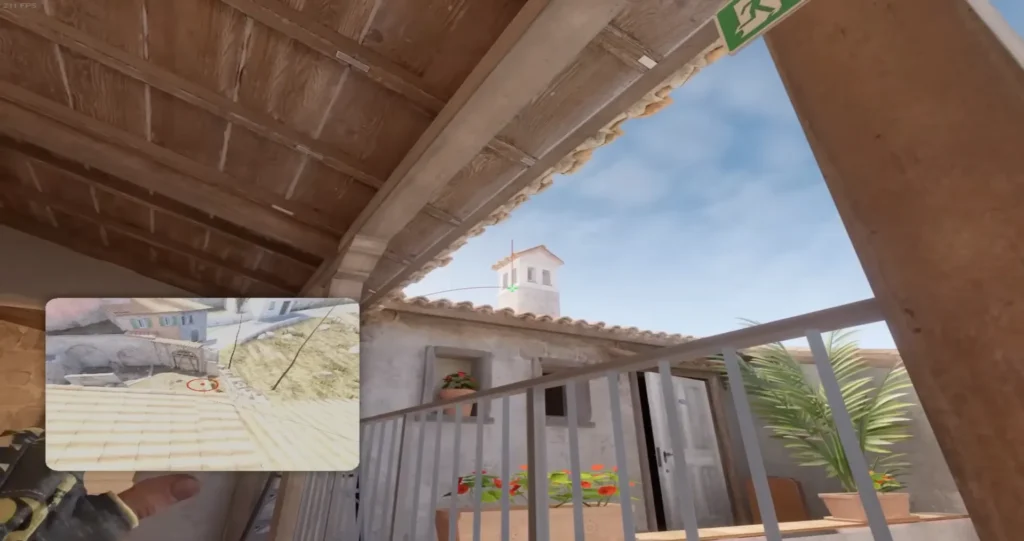
Inferno A Site. Molotov on and under “Balcony.”
In CS2, this position has become much more dangerous, as it’s no longer just a small railing, but a full roof with a wall blocking it from short and apartments. It’s definitely worth worrying about this position, so throw the molotov there as shown in the image. Remember, “Ribs” are already under your control, or long is being watched by a teammate. The molotov lands right in the center of the roof, burning not only the top part but also the position underneath, which is difficult to blind with the usual flash from apartments. Be sure to use this molotov to block multiple positions at once.